HTML Structure

Header

Slider Structure

Footer Section

Footer Essentials

This documentation is last updated on 10 January 2025.
Thank you for purchasing this HTML template.
If you like this template, Please support us by rating this template with 5 stars
images
This folder contains all the images of YogaZone HTML template.
css
This folder contains all the CSS files of YogaZone HTML template.
fonts
This folder font files for various template features.
js
This folder has all javascript files for various template features.
Plugins
This folder has all plugins used in the template.
script
This folder has all script contact form used in the template.
index.html
Home page variation 1
index-2.html
Home page variation 2
index-3.html
Home page variation 3
index-4.html
Home page variation 4
index-5.html
Home page variation 5
index-6.html
Home page variation 6
index-7.html
Home page variation 7
index-8.html
One page Layout variation 8
index-9.html
One page Layout variation 9
index-10.html
Home page variation 10
about-1.html
About page variation 1
about-2.html
About page variation 2
blog-grid-2.html
Blog Grid 2 page
blog-grid-2-sidebar.html
Blog grid 2 with sidebar page
blog-grid-2-sidebar-left.html
Blog grid 2 with left sidebar page
blog-grid-3.html
blog grid 3 page
blog-grid-3-sidebar.html
Blog grid 3 with sidebar page
blog-grid-3-sidebar-left.html
Blog grid 3 with left sidebar page
blog-grid-4.html
Blog grid 4 page
blog-half-img.html
Blog half image page
blog-half-img-left-sidebar.html
Blog half image with left sidebar page
blog-half-img-sidebar.html
Blog half image with sidebar page
blog-large-img.html
Blog large image page
blog-large-img-left-sidebar.html
Blog large image left sidebar page
blog-large-img-sidebar.html
Blog large image with sidebar page
blog-single.html
Blog single on sidebar page
blog-single-left-sidebar.html
Blog single with left sidebar page
blog-single-sidebar.html
Blog single with sidebar
blog-full-grid-dark-style-1.html
Blog Full Grid Dark Style 1
blog-full-grid-dark-style-2.html
Blog Full Grid Dark Style 2
blog-full-grid-dark-style-3.html
Blog Full Grid Dark Style 3
blog-full-grid-light-style-1.html
Blog Full Grid Light Style 1
blog-full-grid-light-style-2.html
Blog Full Grid Light Style 2
blog-full-grid-light-style-3.html
Blog Full Grid Light Style 3
career.html
Career
contact.html
Contact page variation 1
contact-2.html
Contact page variation 2
contact-3.html
Contact page variation 3
contact-4.html
Contact page variation 4
error-403.html
Error 403 page
error-404.html
Error 404 page
error-405.html
Error 405 page
faq-1.html
Faq page variation 1
faq-2.html
Faq page variation 2
footer-1.html
Footer Style 1
footer-2.html
Footer Style 2
footer-3.html
Footer Style 3
footer-4.html
Footer Style 4
footer-5.html
Footer Style 5
footer-6.html
Footer Style 6
footer-7.html
Footer Style 7
full-page-gallery-dark.html
Full Page Gallery Dark
full-page-gallery-light.html
Full Page Gallery light
gallery-grid-2.html
Gallery grid 2 page
gallery-grid-3.html
Gallery grid 3 page
gallery-grid-4.html
Gallery grid 4 page
header-style-1.html
Header variation light 1
header-style-1-dark.html
Header variation Dark 1
header-style-2.html
Header variation light 2
header-style-2-dark.html
Header variation Dark 2
header-style-3.html
Header variation light 3
header-style-3-dark.html
Header variation Dark 3
header-style-4.html
Header variation light 4
header-style-4-dark.html
Header variation Dark 4
header-style-5.html
Header variation light 5
header-style-5-dark.html
Header variation Dark 5
header-style-6.html
Header variation light 6
header-style-6-dark.html
Header variation Dark 6
help.html
Help Desk
portfolio-1.html
Portfolio variation 1
portfolio-2.html
Portfolio variation 2
portfolio-3.html
Portfolio variation 3
product.html
Product page
portfolio-details.html
Portfolio details page
privacy-policy.html
Company Privacy Policy
services-1.html
Company Services page variation 1
services-2.html
Company Services page variation 2
services-3.html
Company Services page variation 3
shortcode-accordians.html
Accordians page
shortcode-alert-box.html
Alert box page
shortcode-all-widgets.html
All widgets page
shortcode-buttons.html
Buttons page
shortcode-carousel-sliders.html
Carousel sliders page
shortcode-counters.html
Counters page
shortcode-dividers.html
Devider page
shortcode-icon-box.html
Icon box with content page
shortcode-icon-box-styles.html
Icon box with content styles page
shortcode-image-box-content.html
Images box content page
shortcode-images-effects.html
Images effects page
shortcode-list-group.html
List groups page
shortcode-pricing-table.html
Pricing table page
shortcode-tabs.html
Tabs page
shortcode-testimonials.html
Testimonials page
shortcode-team.html
Team page
shortcode-title-separators.html
Separators page
shortcode-toggles.html
Toggles page
who-we-are.html
Who we are page
bootstrap.min.css
This CSS use in Bootstrap framework
bootstrap-select.min.css
This CSS use in select box
magnific-popup.css
This CSS used in image popup
owl.carousel.css
This CSS used in carousel slider
style.css
Main Style CSS file is globally used
style.min.css
CSS minified version for best performance.
switcher.css
This CSS is using in side bar setting panel.
switcher.min.css
CSS minified version for best performance.
templete.css
This CSS used in particular/some pages
templete.min.css
CSS minified version for best performance.
skin-1.css
Color 1
skin-2.css
Color 2
skin-3.css
Color 3
skin-4.css
Color 4
skin-5.css
Color 5
skin-6.css
Color 6
skin-7.css
Color 7
skin-8.css
Color 8
bootstrap.min.css
plugins/bootstrap/css
bootstrap-select.min.css
plugins/bootstrap-select
all.css
plugins/font-awesome/css
all.min.css
plugins/font-awesome/css
magnific-popup.css
plugins/magnific-popup
owl.carousel.css
plugins/owl-carousel
scrollbar.css
plugins/scroll
themify-icons.css
plugins/themify
counterup.min.js
custom.js
custom.min.js
html5shiv.min.js
imagesloaded.js
jquery.min.js
respond.min.js
bootstrap.min.js
bootstrap-select.min.js
popper.min.js
bootstrap-select.min
jquery.bootstrap-touchspin.js
jquery.countdown.js
counterup.min.js
waypoints-min.js
imagesloaded.js
magnific-popup.js
masonry.filter.js
masonry-3.1.4.js
owl.carousel.js
scrollbar.min.js


Very first thing you need to do is register your website on Google recaptcha to do that click here.
Login to your Google account and submit the form.
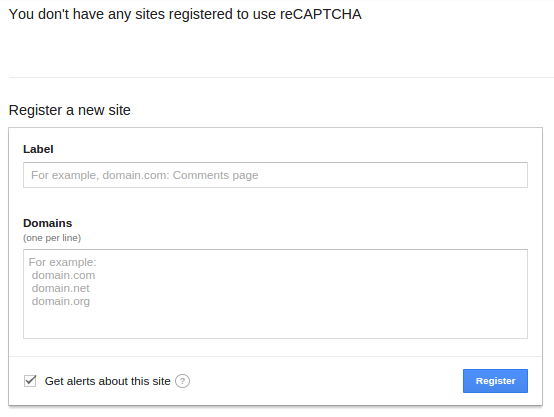
Once submit, Google will provide you following two information.
To integrate it into your website you need to put it in client side as well as in Server side. In client HTML page you need to integrate this line before HEADtag.

And to show the widget into your form you need to put this below contact form, comment form etc.

When the form get submit to Server, this script will send ‘g-recaptcha-response’ as a POST data. You need to verify it in order to see whether user has checked the Captcha or not.
Here is the HTML code for the simple form with comment box and submit button. On submit of this form we will use PHP in back-end to do the Google reCAPTCHA validation.

This will generate this form.
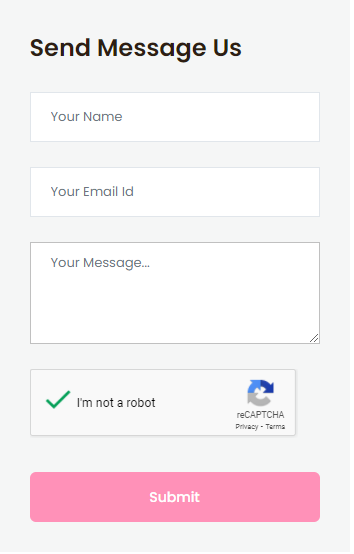
On server side i am using PHP for now. So on Form submit request we will check the POST variable.

try out the demo to see how it works.
MailChimp is an email marketing service, helps to manage the subscribers of your website. MailChimp provides an easy way to integrate email signup form in your website and send the email newsletter to the subscriber. Beside the premium plan MailChimp also has a forever free plan. Using the free plan, you can add up to 2,000 subscribers to MailChimp and send 12,000 emails per month to the subscriber.
In this tutorial, we’ll show you how to integrate newsletter subscription form in your website and add subscriber to list with MailChimp using PHP. We’ll use MailChimp API 3.0 and PHP to add subscriber to list without confirmation email.
To integrate MailChimp API in PHP you need a MailChimp API Key and List ID where you want to add members. Before you begin, sign up for a MailChimp account and follow the below steps to get API Key and List ID.
Get API Key:
1. Login to your MailChimp account.
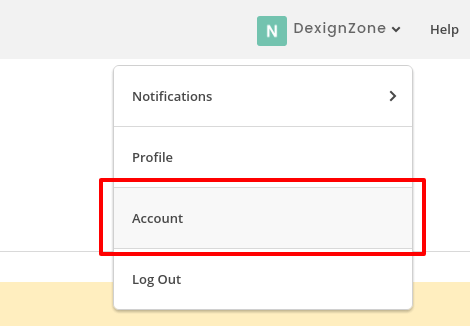
2. Under the user menu dropdown at the top left side, click on Account link.
3. Go to the Extras » API Keys from the top navigation menu.
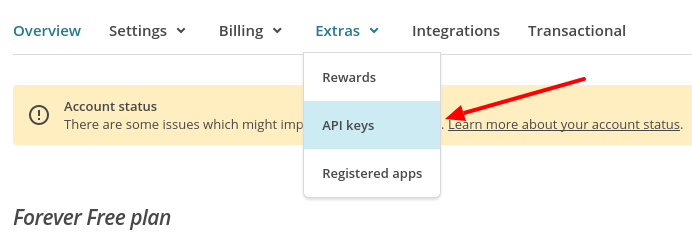
Under the Your API keys section, create an API Key by clicking on Create A Key button. Once generated, copy API key for later use in PHP script.

Get List ID:
1. Choose a list in which all the subscriber’s information would be stored. In that case, you need to create a list in the Lists page.
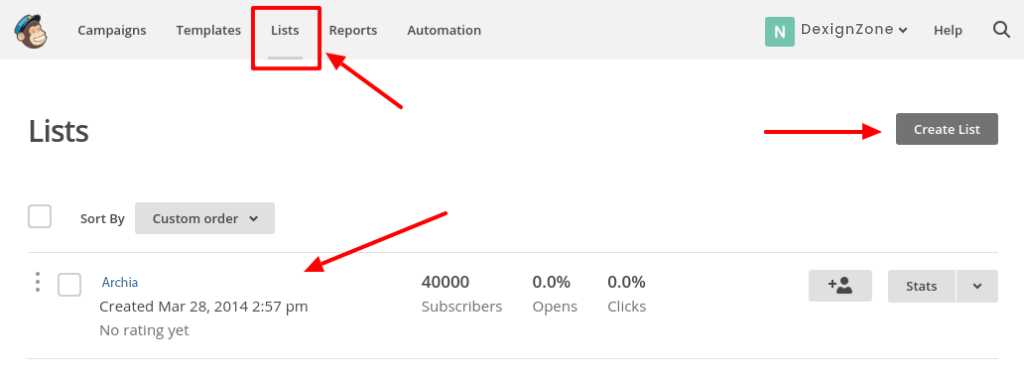
Enter into your created list and navigate to Settings » List name and campaign defaults.

Under the List ID label you will find the List ID. Copy List ID for later use in PHP script.

In our example script, a simple newsletter subscription form will be implemented. Once the user submits the subscription form along with the details (First Name, Last Name, and Email), respective details would be added to the list of MailChimp account using MailChimp API and PHP. Also, the subscriber would be able to receive the newsletter of your website via MailChimp.
Subscription Form (index.php)
The index.php file contains the custom subscription form HTML. The subscriber needs to enter their First Name, Last Name, and Email. By clicking on SUBSCRIBE button, the form will submit to the action.php file for adding the subscriber to the MailChimp subscriber list.

Add subscriber to MailChimp List (action.php)
In the action.php file, subscription form data is received and send the subscriber details to the MailChimp using MailChimp API and PHP. To Use MailChimp API, you need to mention API Key and List ID. Insert the API Key and List ID which you’ve got in the previous step.
Here cURL is used to send an HTTP POST request to the List Members endpoint with member information. After adding the subscriber to MailChimp list, the call returns a response. Based on the response ($httpCode) , the status message would be shown to the subscriber.
To add a subscriber, you must include the subscriber’s status in your JSON object. If you include the subscriber’s status subscribed , subscriber email address would be added right away without sending a confirmation email. Use pending status to send a confirmation email to subscriber.

This example code helps to add subscribers to mailChimp list from the website through custom subscription form. You can see the added subscriber’s list from MilChimp account. Login to your MailChimp account and go to the subscriber’s list, you’ll see the newly added subscribers in the list.